
Header image: ﻼF

(May 6, 2024) Maybe Even Build a Boat: Rediscovering the lessons of craft
https://hedgehogreview.com/web-features/thr/posts/maybe-even-build-a-boat
- A few years ago, when my daughter was a freshman at Columbia University, one of only a few from Arkansas, I had the audacity to propose to then-president Lee Bollinger that the university add a hands-on component to its core curriculum. [YES!]
- Rousseau suggested that if you put young people in a workshop, their hands and brains will be equally engaged, and they will become philosophers while thinking themselves only craftsmen. There’s a certain element of beauty in that.
- Imagine philosophers invested concurrently with thoughts of highest ideals and with a sense of humility concerning themselves and their place in the whole operation of life.
- I became acquainted with a system of craft education called “educational sloyd” (a curriculum that originated in Finland in 1865) that mirrored my own observations of how the hands and mind work in tandem and how each is diminished without the other
- instills an understanding of the dignity of labor
- an important point since life in a democracy must be based on a sense of commonality and respect, regardless of one’s position in the vast scheme of things.
- instills an understanding of the dignity of labor
- It is interesting to note that Columbia University’s own Teachers College was founded to fulfill a desperate need for teachers of manual and industrial arts.
“Objectives are likely to be much more effective if teachers conceptualize what students might and ought to know, feel, and do at the end of a lesson rather than the beginning”.
Petrina, S. (2007). Advanced teaching methods for the technology classroom. Information Science Publishing. https://blogs.ubc.ca/dandt/files/2014/07/Petrina2007.pdf
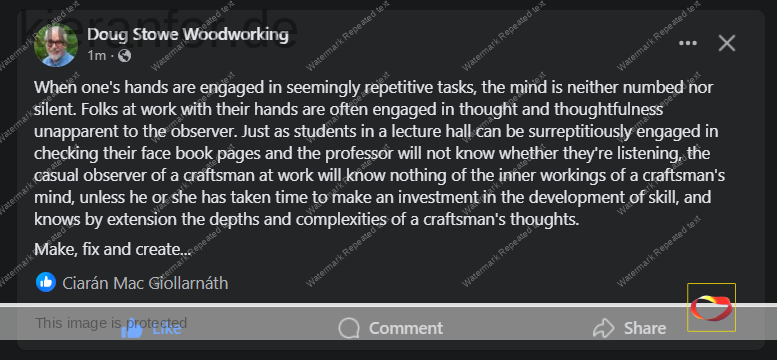
I have a simple hypothesis. We are suffering in this country from an anti-intellectual divide. It runs generally, but not exclusively, along a rural-urban divide. Perhaps if urbanites spent less time looking down on their rustic brethren and infused their own experience with the common wisdom that the hands can provide, the so-called anti-intellectual class might spend more time looking a little more favorably on their urban cousins. The result might be greater empathy for one another.
Doug Stowe
- TALLY HO https://sampsonboat.co.uk
- A Boat in the Woods https://www.youtube.com/@aboatinthewoods
(Jan 19, 2024) AI, Misinformation, and Manual Arts Training
https://www.frontporchrepublic.com/2024/01/ai-misinformation-and-manual-arts-training/
- TLDR: To better combat the destructive use of AI, citizens need to relearn the lost art of personal scientific inquiry, of learning from direct experience to build a structure for evaluation of belief. The point is not so much to combat individual bits of misinformation as it is to foster more discerning humans. And it can start with children, specifically with the proven strategy of introducing them to the manual arts at an early age, where they can learn about the real world, learn about each other and themselves, and learn more directly about cause and effect.
- In the early days of manual arts training in the U.S., there were two rival systems introduced.
- One was called the Russian system, it having been introduced from Russia. Its purpose, at the beginning of our industrial age, was to develop a skilled workforce capable of running the machines.
- The rival system was introduced from Sweden and Finland and was called Educational Sloyd, or the Swedish system. It had purposes beyond that of simply training folks for industrial employment. Inspired by Friedrich Froebel’s original Kindergarten, it aimed additionally at developing a citizenry in which all people felt respect for each other.
Looks like a great idea for a TLSM project
We start with interest of the child.
Otto Salomon: Theory of Educational Sloyd
We build from the known to the unknown
From the easy to the more difficult
From the simple to the complex
and from the concrete to the abstract.
- Educational Sloyd was first developed by Uno Cygnaeus, a Lutheran priest chartered by the Russian Czar to develop a system of Folk Schools for all Finland.
- [The word sloyd is derived from the Swedish word slöjd, which translates as crafts, handicraft, or handiwork.]
- Cygnaeus insisted that all children needed to be trained in the manual arts to understand and respect all labor—even those who might never pick up a tool must know the value of work done by others. Shared experience is a building block for a successful society.
Work with the hands is an equalizer. It helps those who may not yet be academically inclined to demonstrate expertise. When schools took on the role of sorting kids, some for college and some for the trades, it was disastrous. Some students were targeted upward and some down based on standardized tests that we know to be faulty and biased. And separating hands from head proves detrimental to both.
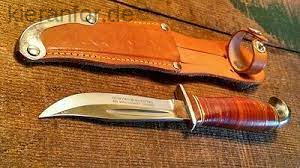
https://www.iisakkijarvenpaa.fi/us/partio-knife.html
- In Educational Sloyd the knife was the beginning tool in a series of exercises to build skill and understanding. The knife was the first tool introduced because in that era, all children in Sweden and Finland were already practiced in using it without injury to themselves or others.
- Developing the fundamental skills of scientific investigation begins early, as you can’t whittle a stick without observing the effects of the knife. If the blade is digging too deep, you “hypothesize” [“theory”] and alter the angle or reverse the stick to compensate [“practice”] for the direction of the grain. While the hypothesis in this case is non-verbal it nevertheless, builds a framework of shared understanding.
- When the manual arts movement was launched in the U.S., there were two recognized fathers of the revolution. Calvin Woodward at Washington University and John Runkle at MIT
- “scaffolding”…educational psychologist Jerome Bruner
https://www.change.org/p/consumers-who-are-fed-up-with-this-offensive-language-remove-the-word-negro-from-black-crayons
It is easy to juggle with words, to argue in a circle, to make the worse appear the better reason, and to reach false conclusions which wear a plausible aspect. But it is not so with things. If the cylinder is not tight, the steam engine is a lifeless mass of iron of no value whatever. A flaw in the wheel of the locomotive wrecks the train. Through a defective flue in the chimney the house is set on fire. A lie in the concrete is always hideous; like murder, it will out. Hence it is that the mind is liable to fall into grave errors until it is fortified by the wise counsel of the practical hand.
Charles H. Hamm, Mind and Hand, 1886
- In the early days of the introduction of manual arts training in the U.S., many educators worried that taking time for it from busy schedules would retard academic studies….
- KF: Recall the great BCTEA FB ‘Retarded’ debate
- … just as today Kindergarten (twisted from what Froebel had in mind) has become the new first grade in an ever-increasing demand that children read and thus acquire knowledge third hand, while original shop classes and Kindergarten both emphasized first building knowledge from real life.
- From the known to the unknown, from the easy to the more difficult, from the simple to the complex, and from the concrete to the abstract offers a view of the way knowledge and a sense of truth are constructed, built through the senses in response to observation and the encouragement to reflect. We all have hands, and common use of them begins to build a structure of shared understanding that has the power to remake the world in which we live. That’s probably why the Kaiser outlawed Froebel’s Kindergarten in 1851, and that’s exactly why we need a renewal of Froebel’s Kindergarten and universal manual arts education now.
(Feb 9, 2023) First lesson in Japanese boatbuilding: Don’t speak. https://news.harvard.edu/gazette/story/2023/02/first-lesson-in-japanese-boatbuilding-dont-speak/
- A dozen students, many with little to no woodworking skills, were building a 22-foot Japanese boat (wasen) using traditional techniques and tools in a Wintersession workshop tied to the Reischauer Institute’s 50th anniversary celebration. It was led by Douglas Brooks, a longtime professional boatbuilder who has spent decades apprenticing in Japan.
“It is about trying to achieve a silent workshop, and teaching without teaching, or teaching with as few words as possible,” said Brooks. “Students learn they have to pay attention, they have to watch carefully, because that’s the way they learn.”
“Learning any culture’s approach to something that you think you’re already familiar with is very enlightening,” Kade Kelsch ’24 said. “Having done carpentry with my father, doing mechanical engineering, I do a lot of work with materials and machining, but this has a different approach to it. It’s very holistic.”“Craft knowledge certainly is a form of intelligence that can be as important as anything that generates knowledge in the humanities and the sciences, in the social sciences,” said Yukio Lippit, Jeffrey T. Chambers and Andrea Okamura Professor of History of Art and Architecture, during the session. “It involves forms of bodily memory and decision making that are uniquely corporeal and nonverbal and silently transmitted in craft traditions so easily overlooked.”